Install TodoCity
Download TodoCity for Mac, open it, allow the permissions you want to use, and keep it up to date on its own.
TodoCity is a free Mac app. You download it once, drag it into Applications, and from then on it lives in your menu bar.
What you need
- A Mac with macOS 11 or later, Apple silicon and Intel.
- Enough space for one AI model, which TodoCity downloads from inside the app the first time you open it. AI models lists how big each one is.
You don't need an account, and there's nothing else to install.
Download and open
- Download. Get TodoCity-macOS.dmg, the latest release (version 0.4.74).
- Open it and drag TodoCity into Applications.
- Open TodoCity. It's signed and notarized by Apple, so it opens just like any other Mac app.
- Take the three-step tour. You'll pick your on-device model, choose how you want to capture, and try it out on a sample message. See Quick start.
TodoCity opens automatically when you log in. If you'd rather it didn't, turn off Settings → General → Open at login.
Tip
Keep TodoCity in Applications. Connecting AI agents only works when TodoCity is opened from there.
Permissions TodoCity asks for
Before an app can read the text you select, send notifications or use your calendars, macOS asks you first. TodoCity only asks for each permission when you start using the feature that needs it.
| Permission | What it's for | When TodoCity asks |
|---|---|---|
| Accessibility | Reading the text you select, for the capture shortcut (⇧⌘S) and for Watch | When you choose the shortcut in the tour, or the first time you capture with it |
| Notifications | Reminding you when a task is due | When you finish the tour, since reminders are on from the start. Later on: Allow notifications… in Settings → Notifications |
| Calendars | Showing your meetings and putting tasks in Apple Calendar | When you turn on Apple Calendar in Settings → Connectors |
| Reminders | Syncing both ways with Apple Reminders | When you turn on Apple Reminders in Settings → Connectors |
| Data from other apps | Reading your Things 3 library | When you click Find my Things library |
Pressing ⌘C twice doesn't need any permission. It works in every app as soon as TodoCity is running.
Allow Accessibility
- Open System Settings → Privacy & Security → Accessibility. If you're in the tour, Allow in System Settings takes you straight there.
- Turn on TodoCity.
- Press the shortcut again. TodoCity picks up your selection right away.
Private by default
Accessibility lets TodoCity read the text you've selected when you press the shortcut. That text goes to the model running on your Mac, and nowhere else.
Updates
TodoCity checks for updates by itself and downloads them in the background, so a new version never gets in your way.
- In full screen, a small Update ready appears in the footer once the new version has downloaded. Click it to see what's new and update.
- In the side panel, a note tells you the new version is ready, with Update now and Later. Your tasks stay just as they are.
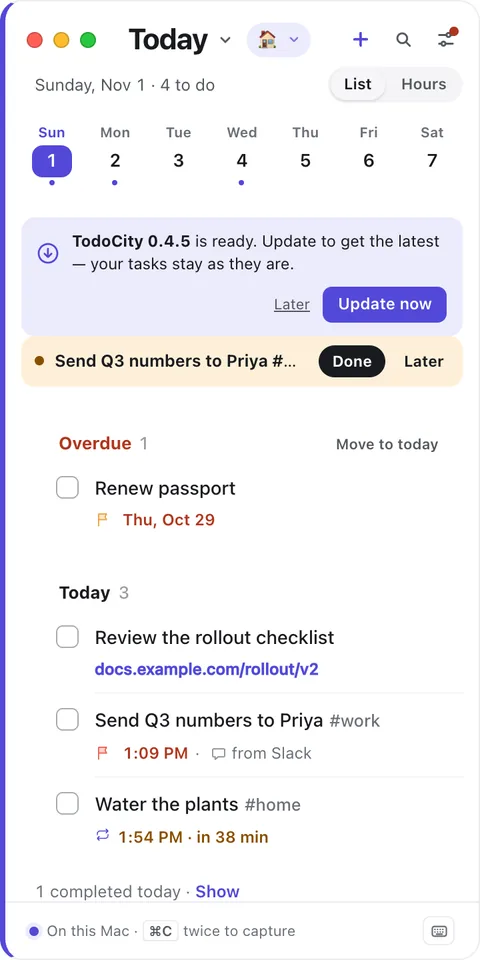
You'll find your version number in Settings → General → Updates. You can click Check now there, or Restart to update once a new version is waiting. Update automatically checks once a day. If you turn it off, TodoCity only checks when you click Check now.
Private by default
Update checks go to GitHub, which is where TodoCity's releases are published.
Check your download (optional)
Every release is built by TodoCity's public release workflow and comes with a signed build-provenance attestation. If you have the GitHub CLI installed, you can verify it yourself:
gh attestation verify ~/Downloads/TodoCity-macOS.dmg --repo pillieshwar/TodoCity
Uninstall
- Quit TodoCity from its menu-bar icon.
- Move TodoCity from Applications to the Bin.
- Remove it from System Settings → Privacy & Security → Accessibility.
Your tasks and models stay in your data folder until you delete it yourself. If you use sync between your Macs, turn it off in Settings → Your other Macs before you uninstall.